Halloween Front Porch Decor: A Complete Guide to Getting It Right (Without Looking Like a Party Store Exploded)
My first real attempt at Halloween porch decor was, in hindsight, a disaster. I bought every orange and black thing at Target — a strobe light, three different spiderweb packs, a plastic cauldron, a witch that cackled when you walked by — and threw it all on a 6-foot stoop. It looked like a garage sale, not a porch. It took me two more years of tearing things down and starting over to figure out what actually makes Halloween porch decor look styled instead of dumped there.
The fix wasn’t more stuff. It was fewer things, chosen better, and arranged with some actual logic.
How Much Time and Money You’re Really Looking At
Be honest with yourself about scope before you buy anything.
– A simple refresh — doormat, some faux webbing, three pumpkins, a strand of string lights — takes about 1–3 hours and runs $25–$75.
– A fuller layered display with a wreath, lanterns, mums, a statement prop, and some hanging elements takes 4–8 hours to pull together and lands around $100–$250.
– Go big — a 12-foot skeleton, animatronics, projector effects — and you’re looking at $300 and up, but a lot of that is a one-time cost since these pieces last for years if you store them right.
Porch size doesn’t actually limit you much. I’ve done a great-looking display on a narrow apartment stoop with nothing but a wreath, a doormat, and bats taped up the doorframe. Small spaces just mean you focus everything at the door instead of spreading it across a railing.
Pick a Design Identity Before You Buy Anything
The single biggest reason porches look chaotic is that people mix five Halloween “ideas” instead of committing to one. Decide which lane you’re in:
– Haunted farmhouse — hay bales, cornstalks, mums, wood crates, a skeleton sitting in a rocking chair
– Modern monochrome — black, white, gray, silver, with purple LED uplighting instead of orange
– Classic spooky — the orange-and-black combo most people grew up with, pumpkins and webbing and bats
– Playful and kid-friendly — a cute wreath, a friendly ghost, a doormat that says “Hey Boo,” nothing that’ll scare a four-year-old
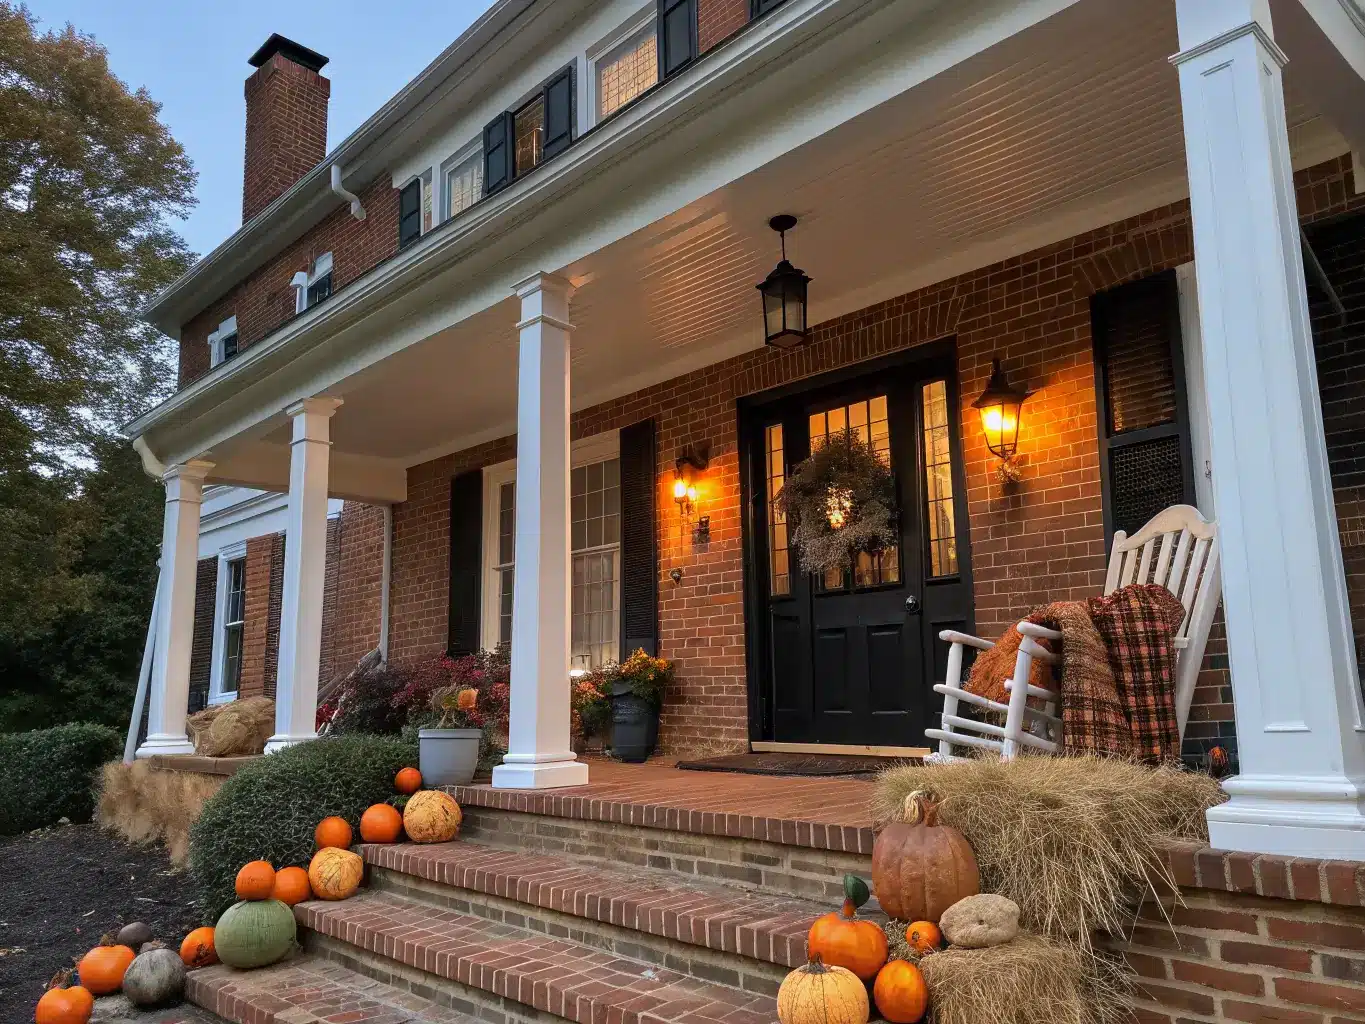
I’ve done both farmhouse and modern monochrome on my own porch over different years, and the monochrome version photographs better but the farmhouse version gets more compliments from actual neighbors walking by. Pick based on your house’s existing materials — a brick colonial leans into classic orange/black naturally, while a house with black trim or modern fixtures can pull off the monochrome look without looking like a costume.
Materials that show up again and again in good porch displays: faux and real pumpkins, mums, hay bales, cornstalks, wheat stalks, spider webbing, cheesecloth (for ghost effects), fishing line (for hanging anything), Command hooks, metal lanterns, moss, and plaid ribbon. You don’t need all of these. You need the four or five that match your chosen style.
The Pieces Worth Buying
Hero pieces — spend here
– A statement skeleton. This is the trend right now for a reason — a large skeleton, even a 5-footer, reads from the street in a way that ten small props never will. If you’ve got the budget and storage space, the oversized 12-foot versions are dramatic, but a 4-5 foot skeleton propped in a chair does 80% of the job for a fraction of the cost.
– A Halloween wreath. This is your highest-impact, lowest-effort item. One wreath with bats or skulls worked into dried florals instantly signals “this house put thought into it.”
– A good doormat. Cheap ones curl at the edges after one rain. Spend the extra $15-20 for a coir mat with a design baked in, not printed on.
Complementary decor — mix sizes
Buy pumpkins in mixed sizes and finishes — a couple of big ones (11-12 inches), several mediums, and a handful of minis. Mixing orange, white, and faux-carved finishes looks more collected than five identical orange pumpkins from the same multipack. Group them in clusters of 3 or 5 — odd numbers read as “arranged,” even numbers read as “placed.”
Mums, hay bales, and cornstalks are your bridge pieces — they let the display shift into general fall decor once Halloween passes, which stretches the value of what you bought.
Lighting — don’t skip this
A porch that looks great at 3pm and disappears at 7pm is only half-done. String lights, lanterns with flameless candles, and purple LED spotlights are what make the display work after dark, which is when most trick-or-treaters actually see it. Test everything at dusk before the 31st — I’ve had battery candles that looked bright in my hallway completely wash out against porch light.
Signature accessories
Spiders, paper bats, witch hats, witch legs sticking out from bushes, crows on the railing — these are Halloween shorthand and cost very little, but don’t buy ten different critters. Pick one motif and repeat it at least three times. Three bats over the door, one bat on the wreath, one bat on the mailbox reads as intentional. One bat, one spider, one witch hat, one ghost reads as leftover inventory from four different decades.
Optional Upgrades That Make It Look Expensive
– Floating/hanging elements. This is the trend I’d bet on this year — witch hats suspended at different heights with fishing line so they look like an invisible witch is standing there, or pumpkins “floating” up a staircase. It’s a $10 fishing line trick that looks like a $200 prop.
– Spanish moss and dried branches at the base of your pumpkin clusters age everything instantly. Moss is maybe $6 a bag and does more for realism than another plastic prop.
– Metal lanterns instead of plastic ones. They cost more upfront but photograph better and don’t yellow in storage.
– Purple LED uplighting aimed at your door or a tree branch. This one change is what shifts a porch from “cute” to “actually spooky” after dark.
How to Actually Set It Up
Clear first. Get the summer doormat, the dead planters, and the porch furniture you don’t want in the shot out of the way. Decide your vibe before you touch a box of decorations.
2. The door itself — wreath, a mummy wrap made of gauze, a sign
3. Railings and columns — cornstalk bundles, crows, garland
4. Steps and floor — pumpkin clusters, lanterns, your doormat
Start with your biggest pieces first — the skeleton, the hay bale, the big lanterns — then fill in around them. If you place the small stuff first you’ll run out of room for what actually matters.
Create one clear focal point. Mine is always the door — I do a full mummy wrap with cheesecloth every year, wound around the doorframe with a couple of plastic eyes stuck in at head height. It’s the thing every trick-or-treater comments on, and everything else on the porch is secondary to it. Pick your one “wow” moment and build everything else to support it, not compete with it.
Mistakes I’ve Made So You Don’t Have To
– Overcrowding. My garage-sale year taught me this the hard way — leave negative space around the door and walking path. A porch needs breathing room to read as styled.
– Mixing themes with no color story. Ghosts, pirates, a Frankenstein, a witch, all competing — pick one world and stay in it.
– Ignoring nighttime. A display that’s all daylight-only decor (paper cutouts, non-reflective props) goes invisible exactly when most people see it.
– Cheap props that don’t survive outside. I bought a foam tombstone my first year that was soggy cardboard by day three of light rain. Spend slightly more on anything staying outside for a month — look for “outdoor-rated” or weather-resistant labeling.
– Blocking the door swing or walkway. Nothing kills the mood like a trick-or-treater tripping over a hay bale you put too close to the steps.
Keeping It Cohesive and Making It Last
Stick to your one palette the whole way through — don’t let a stray green prop or a mismatched string light undo the work. Repeat your core materials (moss, gauze, matte black, pumpkins) across every zone so it reads as one scene, not separate decorations that happen to share a porch.
When November hits, you don’t have to start over. Pull the skeletons, the webbing, and anything overtly spooky, and what’s left — pumpkins, mums, wheat stalks, lanterns — carries you straight into a fall look through Thanksgiving. That’s the best argument for buying decent-quality pumpkins and lanterns instead of the cheapest Halloween-specific version: they’ve got a second act.
If budget’s tight, thrift stores are underrated for this. I found two metal lanterns at a Goodwill for $4 each that look better than anything I’ve bought new since. Painted branches, reused faux pumpkins from last year, and one new hero piece a season is a better long-term strategy than replacing everything annually.
New mom embracing the chaos and creativity! 💕 Sharing budget-friendly tips for cooking, DIY hacks, home decor, fashion, and making every moment stylish and affordable